Well, I was going to take these to Gen Con with me and enter them in the Miniature painting contest in the Vehicle/War Machine category, but my hotel had over-booked and I lost the room I thought I had. My loss is your gain, so to speak, because I wasn't going to post the Falcon until after I came home with a first place ribbon! A big thank you to Jon Paulson of Paulson Games for creating such a fantastic miniature...the Raptor mech, that is! By the way, if you want one of your own and want to see the other cool stuff that is to come, go here:
http://www.mechafront.com/page/page/8798042.htm
On with the show....
 |
| Here is the first of four Raptor mechs I have. This comes from the Mecha Front game by Paulson Games. It is a stock Raptor with no modifications other than a comm antenna. The size of this beauty makes it perfect for 10mm or 15mm gaming. The half track is a heavily modified MW:DA JES missile carrier...minus the missiles now! |
 |
| Also of interest are the military buildings. They are plaster castings of empty Oreo cookie trays with Lego bits and other do-dads to help with the details. |
 |
| Rear view. |
 |
| Now we have the heavily modified version. The first thing I wanted to do was modify the static pose into an action pose. I also wanted a slightly different load-out. A big flame thrower and a mech-sized minigun! |
 |
| The napalm fuel tank is a Lego bit. The flamer thrower had one hose attached to it already, but there are two tanks.... |
 |
| I added the hose that snakes up over the shoulder by clipping a length of cheap necklace. The right foot is glued up in a half step. Since the bottom of the foot was exposed, I had to engrave a tread pattern to the bottom with my Dremel. I wanted to extend the left leg into a striding pose so I cut the knee, sculpted a new knee joint and an ankle joint, and them fixed them into a new pose. |
 |
| The dripping napalm is a glue-soaked wad of cotton swab, as is the burning puddle on the ground. The flame nozzle is another Lego piece that I drilled some holes into. The other gun is a simple barrel swap. The searchlight is another Lego piece with a jewel fixed into the lens. |
 |
| The other droplets of napalm are just globs of glue. Here she is with the basic Raptor and A MW:DA Madcat so you can get an idea of how good she looks with my 10mm forces. |
 |
| I almost forgot! I carved out some side ports for the cockpit and added a hatch and an exhaust vent on top of the mech. I wanted the flamer barrel to look like it was red hot from recent usage...not that the dripping napalm was also a dead give-away. |
 |
| Oh, one more thing. My friend Owen wanted a close up of the nose art. |
 |
| Now I present the ship that made the Kessel run in 12 parsecs...the Millennium Falcon! This is the 1/144 scale model from Fine Molds, and I must say it really is fine! |
 |
| You can see Han Solo discussing his cargo manifest with the port authorities. The landing pad is a Perkins pie pan. The caramel apple pie was delicious, by the way! |
 |
| You might notice something funny about the landing gear.... |
 |
| ....It is a temporary cradle! Since I wanted this to be either in flight or landed, I designed a landing gear cradle using the gear that came with the model and a rig made out of illustration board. They are all aligned so they match up to the underbelly perfectly. |
 |
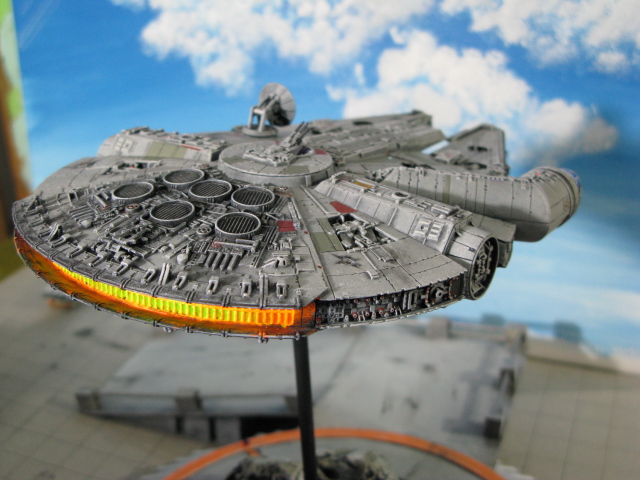
| Here she is in flight. |
 |
| No, it is not lit up. Thanks to the miracle of florescent paint, it only looks like she's in after-burn. |
 |
| I wanted to add a few extra details to make her a bit more than just out-of-the-box. I added some little detailing decals and a bit of battle damage with my trusty Dremel. |
 |
| The underside with the landing gear bays sealed permanently. |
 |
| We're not out of this yet, kid! |
 |
| The flight base is a bit of custom work using a wooden base, a brass rod, and a chunk of blue styrofoam. I wanted an asteroid look out of the styrofoam so I gouged some holes into it and carefully applied paint stripper to melt the foam into a rugged look. |
 |
| In case you were wondering just how big she is, here is my thumb. |
 |
| If the cockpit came with a crew, I would've left it clear. Sadly, there were no crew members included. |
 |
| The navigation lights and the torpedo bay. I painted the torpedo bay before I assembled her, otherwise there would be no way to paint it, and I didn't want to overlook a thing on this baby. |
 |
| The amount of detail on this model is simply stunning. Every part fit precisely with no filling and very little sanding required. They aren't know as Fine Molds for nothing! |
|
|
|
|
|
Well, another successful blog post. I hope you enjoyed it. I guess Gen Con will have to wait until next year.